Showing posts with label tutorial. Show all posts

Craft: Beaded Hair Tie


Hair ties are always useful to be around. I always have one with me, either on my head forming a nice pony tail or on my wrist getting ready to be used. To add an aesthetic value to this practical accessory why not add some embellishments to it so it can look good both as a hair tie and as a bracelet when you are wearing it around your wrist?

For this DIY you will need:
1. Hair tie
2. Pilers
3. Jump rings 
4. Flat T pin
5. Pearlescent and glass beads


  1. Start by gathering all the materials and determining what colour of beads you would like to use. 
  2. Place bead to the T head pin. Trim head pin to length and bend the pin 90 degrees above the bead.
  3. Create head pin loops to each of the beads using the pilers.
  4. Using jump rings, link the beads together. To create levels join the jump rings for two or three times before adding the beads to the end of the chain.
  5. Link all the separate sections with one big jump pin.
  6. Secure the dangle cluster to an elastic hair tie.


Sunday Sketch vol.1: Watercolour Floral Painting

I'm happy to announce that I have survived the first year of uni! This is a busy year but I have learned a lot about animal science and biology. It is fun to have those random facts I heard from the lectures pop up from my mind while shopping for cotton sweaters, or soaps, or eggs. (I know, it is all very random.) Now I am back home, I am excited to use this months-long summer holiday for crafting, drawing or maybe even some cooking. 

The soft, elegant and dreamy properties of watercolour have always attracted my interest. I have tried it out today and what a better way to share my process with you. Hope this will become an inspiration for you. 

First, draw the outline of the flowers with a light pencil, then fill in the space with a light wash of colour. Add another of a darker colour until the expected colour is reached. I do not have a watercolour palette so I used watercolour pencils instead.

Click here to view the step-by-step guide in full size.


DIY: Small Flower Arrangement

With spring around the corner, brighten your day with a whimsy arrangement of fresh flowers. It is lovely to have colourful florals that brings life to your house. You don't always have to buy them from a florist though, there are surely gems hidden in your neighbourhood among the foliages for you to discover. Take a stroll outside after dinner and look for blossoms that bloom in the season. Trust me, this is so relaxing it will be one of the most enjoyable moments of your week.

I have found flowers in different colours and texture. I have got purple, red, white and yellow flowers with board and needle shaped of leaves. Play with these elements to create an interesting arrangement. Also, try to search for plants that can stay alive for a longer period of time so you won't have to change flowers as often.

I have used a candle holder as a vase, but there are many more ways you can style it. You can use buckets, ornamental vessels, or even teacups which will certainly be cute and chic. 


Display your collected flowers in your vase half-filled with fresh water, place it on your table and admire your beautiful visual display. It is an easy and pretty craft that is definitely worth a try.

Tutorial: How to Make Your Own Painted Rock Paperweight

The papers on my desk always got blown away in the windy seasons. It is disaster discovering my 20+ page notes scattered on the floor when I come home from uni. Imagine the time it takes to reorganise them!


A couple rocks from my backyard are very handy helpers to guard my sheets against the wind. I made one from the beginning of the year with a red heart painted on it with nail polish. Now I am going to bring in 3 additional members to my collection and here is how I dressed-up them.

I have sketched of a couple designs and picked the one which is more minimalistic as the final. And then I drew them onto my rocks using an opaque white marker. The one I used is UNI Paint Marker, but you can use other brands such as Sharpie or even another medium such as acrylic paint.

              
First draw a simple triangle and fill in the space within. Add a few dots to one side of the triangle and lines to each side of them.
This is my favourite one: It is just an arrangements of dots in different sizes on one corner of a flat rock. Try to work from a small circle and expand it until it reached the desired size.
For the last one I just smeared white paint to one corner of the rock and let dry. The effect is simple but powerful. I reckon it will look even better in liquid gold/gold foil.

Finish them with a protective seal of varnish and they are good to go!

Tutorial: A guide to the makings of miniature food


It has always been hard for me to tell my friends what I do when they ask me about what I do in my free time. They look confused when I tell them I am "crafting miniatures", but going in lengths explaining about what it is just don't seem right. But still, though this hobby is a bit weird, I am happy that I have discovered it. To all of you that know this craft, or who are interested to it, I'd like to share how I work from start to finish. If your approach is different, tell me about it, I'd love to know! :)


Here's how I do it:

1. Finding ideas
First find out what kind of food you want to make. Do you want to make a donut, cake or hamburger? Search for inspirations either online or from cookbooks/magazine. My favourite is FoodGawker and Pinterest, the submissions/pins are photoed in brilliant photography that makes both your mouth drooling and your stomach rumbling.

2. Draft
Draw your design on a sketch book to help you visualise your work. I find this really helpful in letting myself know what exactly I want, especially in the later stages. I've sketched in the same size scale and added labels of what layer it is on each section (it's almost like biological labelling diagram).

3. Research
Figure out how to create the best colour and texture by working on an experimental piece of clay. If you couldn't think of any idea how to make it, always search online for miniature tutorials. Your favourite miniaturist might have some posts that give you some ideas.

4. Craft!
This is pretty self-explanatory, time to dig in and create your work! My favourite tools are  size 0 pointy paint brushes, toothpicks and X-Acto craft knifes. The key to this is to be patient. Many things can go wrong, maybe it does not look like what you expected or in a miniaturist's nightmare, you dropped the tiny bowl of blackberries you have been working for six hours onto the floor. Sometimes you might need to re-do your work, other times perfecting it. But once you've gone through the process, you will be so happy about your work!

5. Photography matters
Finishing your work is not your last step after all of these many hours you have put into though. You still have to photograph it to share it with people who are not able to see your work directly. To take a even, well-lit photo, try using a light box or a few mirrors toeflect light. Plus, being able to keep a soft copy of what you have done is just delightful. To take a even, well-lit photo, try using a light box or a few mirrors to reflect light. Save it in your phone and share it with your friends when they look confused about what miniature craft is about :)


Tutorial: How to compose a perfect surprise snail mail

Snail mail letter and gift. Nassae Ithilwen.

Whether it is your pen pal, your best friend's birthday or your sibling's Christmas gift, a thoughtful mail with all sorts of notes and presents will certainly be a pleasant surprise to the receiver. Here are some tips and suggestions on what you can include in your assortment of wonderful things.

Pretty note paper letters
There is nothing more heartwarming than expressing what you think of and like about the person you love. Write about the unforgettable memories, funny jokes and tough hardships that you have been gone through together.

Quotes
Find some motivational quotes and sayings that can cheer up your friend when they feel down. Print the quotes or write them in little square card stock decorated with stickers and doodle drawings.

Little presents
Find some beauty product samples (body lotion or hair conditioner) or other gifts such as stickers or hand drawn watercolour cards to give to your loved ones. Wrap them pretty and decorate it with ribbons or washi tapes.

Current obsessions/ mood board
Whether it's the music, art, books, recipes or any other things that you are obsessed with currently, share it with your friend and let them fall in love with your new discoveries as well. Jot them down on a list then folded into a mini envelop, or for the more artistic gals, create a mood board and let them see the collage visually.

Tea/ coffee bags
Nothing is better than reading a letter while sipping a warm beverage, inhaling the flavoursome aroma of the tea/coffee. Include one of these in the mail so they can enjoy this experience.

Snail mail letter and gift. Nassae Ithilwen.
Example 1: (Clock wise from top left) a hand written note, quotes written on a card sealed in a mini envelope, origami paper with current music and websites that I like, small card with gratitudes and things that I want to say to my friend, and a teabag for her.

Snail mail letter and gift. Nassae Ithilwen.Snail mail letter and gift. Nassae Ithilwen.
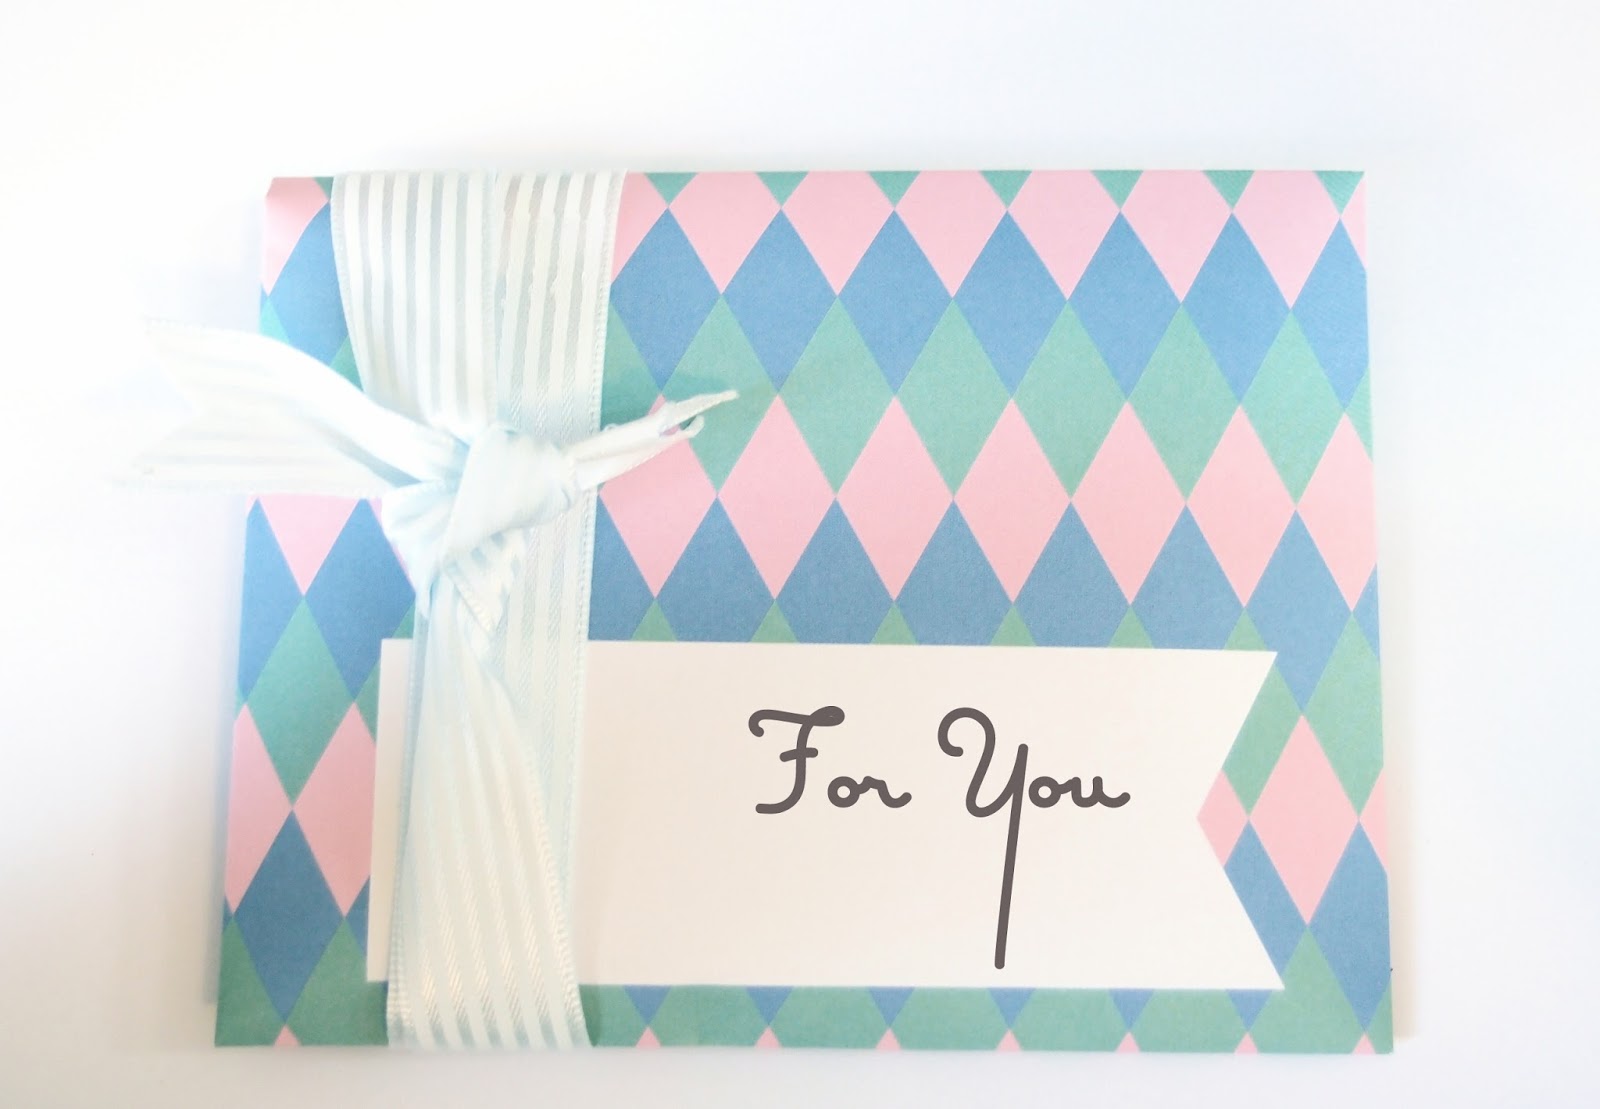
Example 2: (Top) An envelope wrapped with ribbon; (Bottom, from top left downwards) A teabag, an printed note, an envelope, "good music" note, little wrapped present, second note paper, third note sheet, a decorative strip to wrap all the notes together.

For more snail mail inspirations, visit my Pinterest board. Create your own snail mail and spread some love! I am sure you too will enjoy making something pretty for your friend.


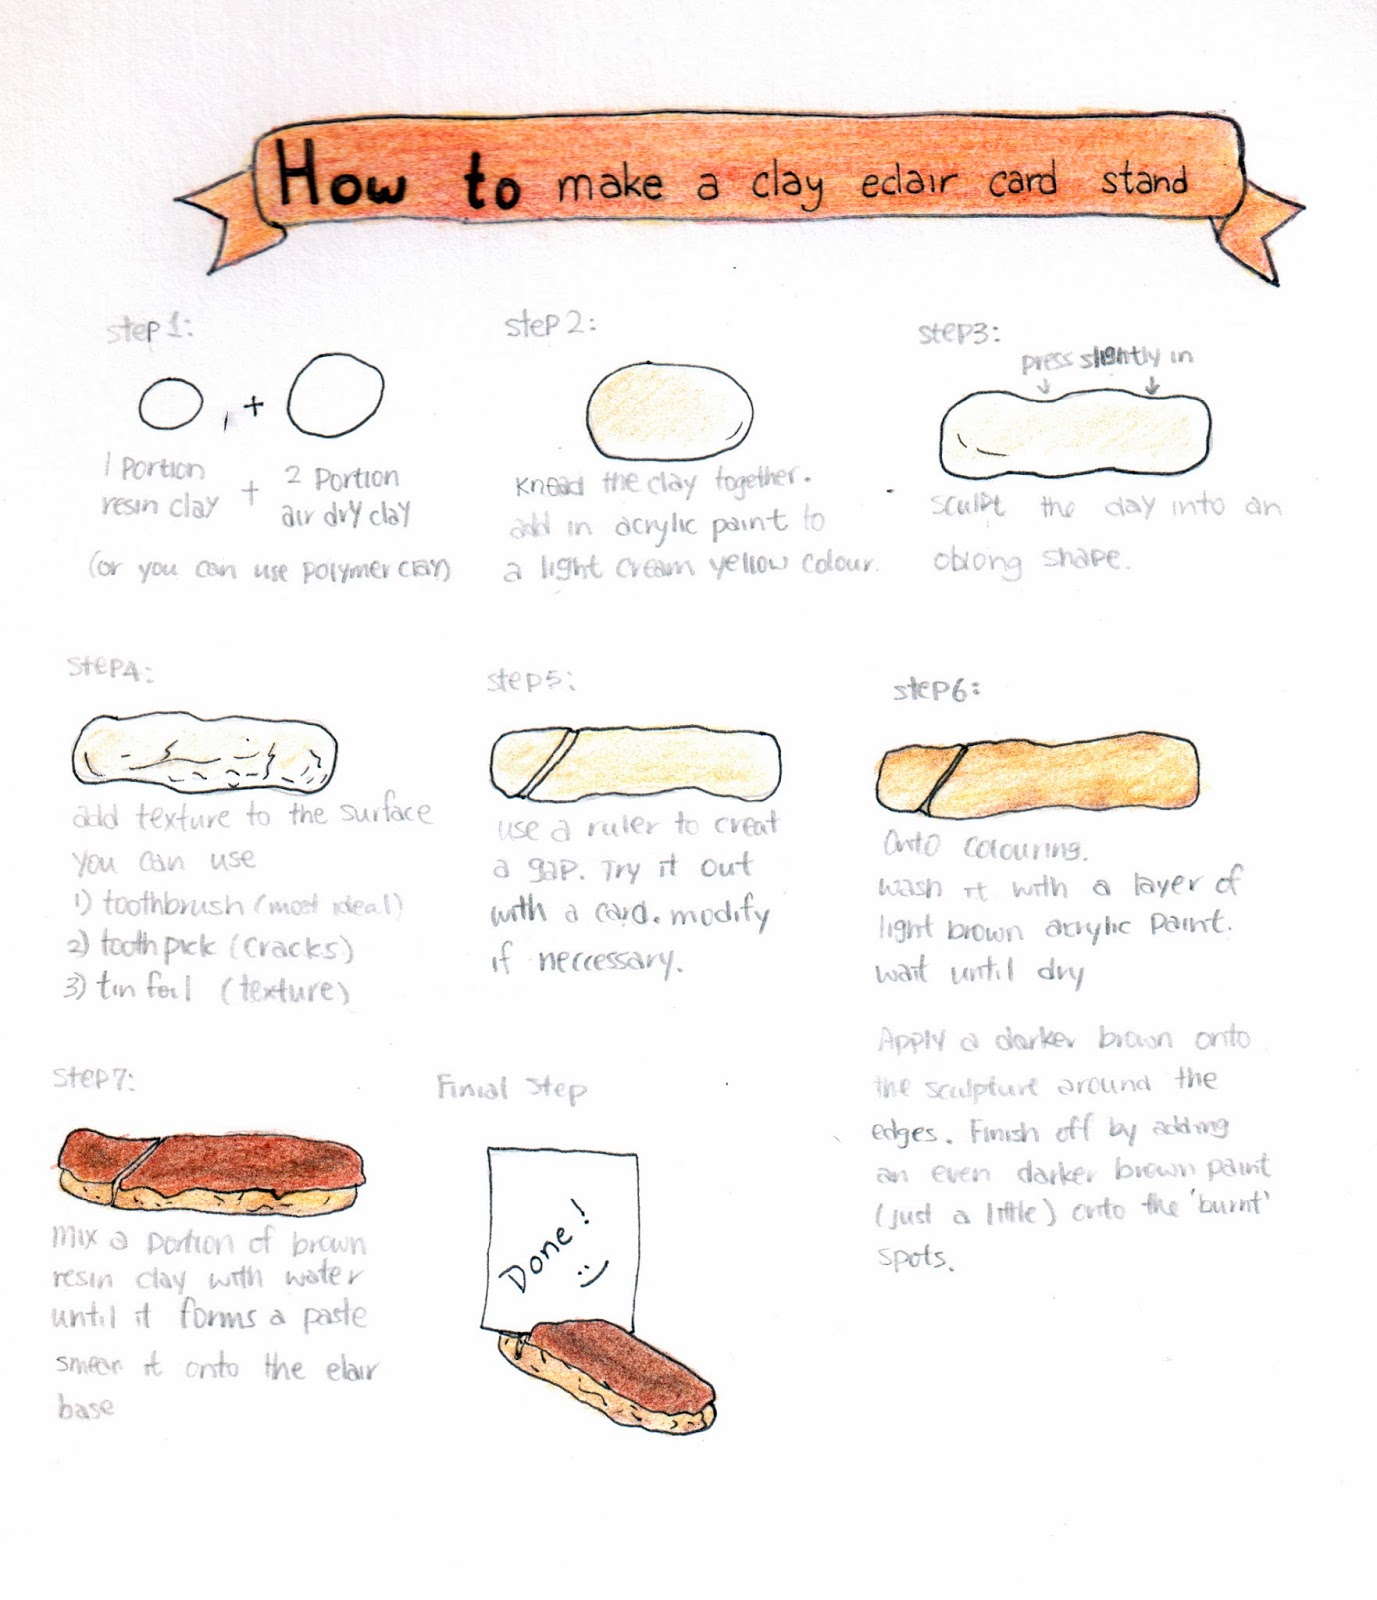
Miniature: Make a clay eclair card stand

Clay Eclair Card Stand - Nassae Ithilwen

How to Make a Clay Eclair Card Stand - Nassae Ithilwen

Open image in new tab to view full-size image.


DIY: Washi Tape Twist Ties


I used to use hair ties to prevent cords from tangling, but discovering an interesting twist tie DIY, why not give them a new look.


There are only thin golden twist ties (those used in baked goods decorations) at my home, but to my surprise they were much stronger then I think.

Giving it a twist I used pink and orange fabric tapes on each side of the twist tie. I am quite happy with the result.

How do you organise your computer cords?

Inspired by how to: washi tape twist ties from the Homesteady

Tutorial: Pimp your notebook 2


I have a weird fondness for brown notebooks.
 Whenever I see them in a store I have an urge to buy a bunch of them. 
But sometimes, despite the love, they do look a little too plain to be used as an everyday journal.
And so I thought it'd be a fun project to turn some of them into personalized designs.
 
The first thing came to my mind is this wonderful Kikki K journal that is unfortunately no longer in store.


A good thing is that it looks easily DIY'd.

Here's a quick how-to:

Supplies you will need
1. A plain notepad
2. Colour paper/ Scrapbook paper
3. White paint/ gel pen
4. Scissors
5. Glue


Draft the outline of the design lightly by a pencil


Decide your colour combination.

If you are stuck in deciding the colours, try brainstorming at colour palette websites.
(I like Design Seeds and Colourlovers, check them out! :)

My final decision is white, green and orange to go with the yellow border.


Drawing the patterns: 
This seems to be the hardest part, but it will get much easier when you do it, I promise.
Guided by your draft, use your gel pen/ paint brush to draw a variety of lines on each row.
It needs a little patience to complete the pattern, but once its done you will know it's worth it :)
Erase the draft borders once the paint is dried.
Almost done! Remember the colour papers we prepared from the start? 
Now it's time to cut them out and stick them onto your notebook.
Put on a protective glaze and it is finished!

This design can also be used on hand-bind cereal box notepads.
Modify the design as much as you like, Get Wild :D


Have fun Crafting!
Nassae

Tutorial: How to Sculpt a Strawberry

Strawberry is one of the most popular fruits being used in miniature. However, it is to me one of the hardest fruit to master. It took me sometime to figure out how to draw the cross section of a strawberry well.

I'd like to share with you a summary of what I've learned so far:

Click here for a full view

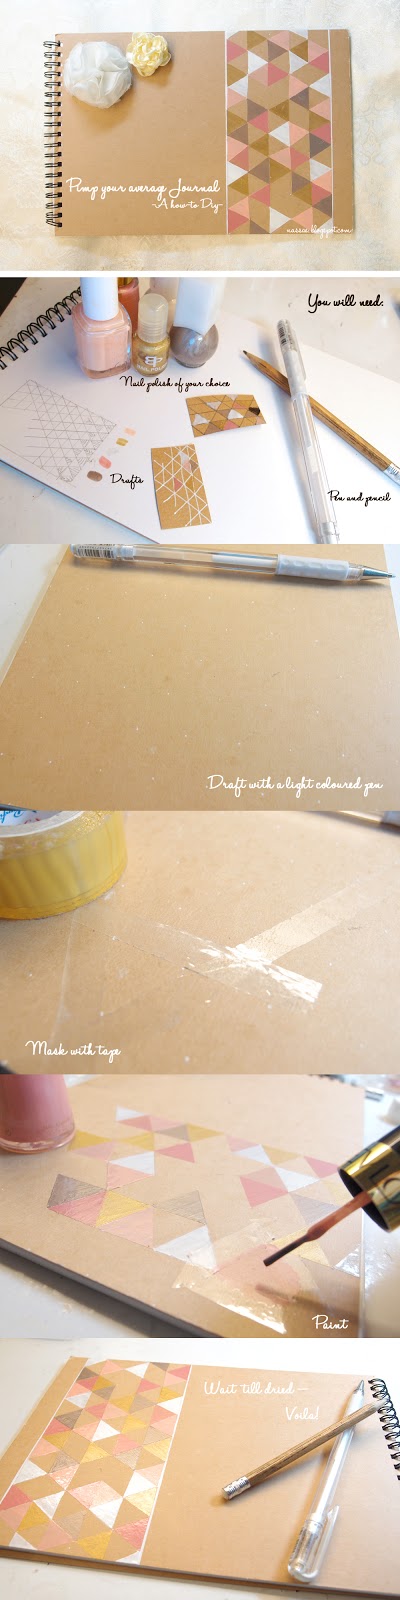
Tutorial: Pimp your notebook

Tutorial: Pimp Your Note Book - Nassae Ithilwen
If you like this, do check out another way to decorate your notebook with easy patterns and craft paper here.